前言
Flutter的交互动画绘制相当方便,仅需几个Path和循环即可实现比较出色的动画效果。我们还可以使用一些便携的动画库来协助我们制作流畅而又优美的动
画。
动画预览
实现思路
此动画由两部分,一个渐变的底色和多个交替的波浪组成。渐变色可以由一个两色间的渐变线性动画实现,而波浪的动画绘制则是通过数学函数对于路径的计算得出。
动画库选择
虽然官方的动画库也能实现对应的效果,但是需要自己封装一套动画的管理逻辑会显得比较麻烦,所以使用已经高度进行集成封装的库来做动画可以减少开发时间,同时达成的效果也会很不错,本记录中介绍到的是使用最为广泛的动画库之一的simple_animations(以下简称SA库)。引用方法为在pubspec.yaml中加入
simple_animations: ^4.0.1
本实例代码中的所有调用都基于4.0.1版本的simple_animations动画库
渐变底色实现方案
首先颜色渐变动画分为两个阶段,一个是橙色到亮蓝色的阶段,另一个是从亮蓝色到紫色的阶段,然后将两个阶段周而复始的进行正向播放后逆向播放的循环。
什么是Tween
首先编写代码前需要了解到一个动画库内所指代的概念——Tween。
它的意思为渐变的,而在SA库中实际代表的是动画中所存在的每一个过渡阶段。
因此在库中初始设定了很多的Tween,例如ColorTween,TimelineTween等,他们预设了几个要填写的会变动的状态值,对值进行修改并传递给动画管理层后将其绘制在对应的widget上。
例如ColorTween内设了阶段内的两个Color类型的颜色值,Matrix4Tween内设置了两个Matrix4类型的向量值,而你也可以通过Tween外加尖括号指定类型来做自定义值的传递。
编写Tween
由于我们需要的是多个阶段在一个大的循环内往复,因此采用了提供的MultiTween来添加多个阶段的动作。其中指定类型为SA库设定的一个默认的属性模板DefaultAnimationProperties,内置了包含颜色方向大小旋转度等多个常规属性值,在这里我们只需针对颜色值进行更改,因此选取里面的color1和color2,使用ColorTween作为单个阶段内的Tween,设定初始颜色以及结束时的颜色,使用add方法添加至MultiTween中,并设定每个动画的平均执行时间为3秒。
    final tween = MultiTween<DefaultAnimationProperties>()
      ..add(
          DefaultAnimationProperties.color1,
          ColorTween(begin: Color(0xffD38312), end: Colors.lightBlue.shade900),
          Duration(seconds: 3))
      ..add(
          DefaultAnimationProperties.color2,
          ColorTween(begin: Color(0xffA83279), end: Colors.blue.shade600),
          Duration(seconds: 3));
将Tween放入Animation中
编写好的Tween仅仅是一个动画阶段,想让他重复播放需要使用SA库包含的LoopAnimation来进行播放,但我们的循环不属于单一的正循环而是交替的正反向循环,SA库同样提供了一个名为MirrorAnimation的方法来完成动画。
其中我们传入的是MultiTweenValues
需要填写的参数有:
tween:对应类型的tween
druarion:对应的动画持续时间
builder:将动画的值变化插入到widget中作出相应的改变,builder中包含三个值,一个Context是对应的上下文关系,而child是对应的MirrorAnimation中可以传入的一个widget对象,value则是传入的Tween中的值,我们想要取出来可以通过value的get方法直接查找对应的类型所传入的值。在这里我们使用了LinearGradient(线性渐变绘制)来控制Container的盒装饰器达成相应效果。
MirrorAnimation<MultiTweenValues<DefaultAnimationProperties>>(
      tween: tween,
      duration: tween.duration,
      builder: (context, child, value) {
        return Container(
          decoration: BoxDecoration(
              gradient: LinearGradient(
                  begin: Alignment.topCenter,
                  end: Alignment.bottomCenter,
                  colors: [
                value.get(DefaultAnimationProperties.color1),
                value.get(DefaultAnimationProperties.color2)
              ])),
        );
      },
    )
波浪纹路实现方案
做过比较多动画的都能接触到较多关于圆形扇形等图案的使用。而在三角函数内,图形呈现波浪形最为经典的便是正弦波。我们绘制它一般通过二阶的贝塞尔曲线绘制法,所以什么是贝赛尔曲线呢?
认识贝赛尔曲线
什么是贝塞尔曲线
Bézier curve(贝塞尔曲线)是应用于二维图形应用程序的数学曲线。 曲线定义:起始点、终止点(也称锚点)、控制点。通过调整控制点,对应的贝塞尔曲线的形状会发生变化。
二次公式

通用公式:

利用控制点的改变我们可以在不同的插值下绘制一个顺滑的动画。
波浪效果的实现逻辑
首先我们需要一个完整的半圆状弧形变换,因此参考的是正弦函数的值分布,那么我们需要取得的值域范围对应的x取值为(0,2π)
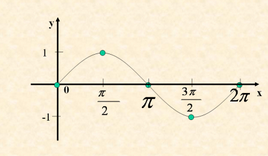
按照二次贝赛尔曲线的绘制方法,我们需要对其中的三个点进行采样,并且采样的宽度需要覆盖一个π的大小以此获取一个半圆弧,其采样流程动态图如下图,采样点选取图中的紫色、红色和绿色圆点所示。
而我们在绘制波浪时除了顶部的曲线还有下面的一个整体,以此再选取黄点和橙点。一共五个点在Canvas中进行绘制,绘制的范围则在五个点所组成的连线内如图中的深灰色所示。
编写对应单波浪代码
构建动画Widget
由于需要使得动画在不同场景下保证能绘制满整个对应的widget,使用LayoutBuilder进行外部构建,并指定宽度为获取到的父组件最大值
使用SA库的LoopAnimation进行往复的循环
LayoutBuilder(builder: (context, constraints) {
      return Container(
        height: height,
        width: constraints.biggest.width,
        child: LoopAnimation<double>(
            duration: Duration(milliseconds: (5000 / speed!).round()),
            tween: Tween(begin: 0.0, end: 2 * pi),
            builder: (context, child, value) {
              return CustomPaint(
                foregroundPainter: CurvePainter(value + offset!),
              );
            }),
      );
    })
绘制波浪代码
自定义一个CustomPainter,设置y1,y2,y3三个采样点的纵坐标,使用Path保存所对应的路径,并在Canvas中使用drawPath方法绘制。
class CurvePainter extends CustomPainter {
  final double value;

  CurvePainter(this.value);

  @override
  void paint(Canvas canvas, Size size) {
    final white = Paint()..color = Colors.white.withAlpha(60);
    final path = Path();

    final y1 = sin(value);
    final y2 = sin(value + pi / 2);
    final y3 = sin(value + pi);

    final startPointY = size.height * (0.5 + 0.4 * y1);
    final controlPointY = size.height * (0.5 + 0.4 * y2);
    final endPointY = size.height * (0.5 + 0.4 * y3);

    path.moveTo(size.width * 0, startPointY);
    path.quadraticBezierTo(
        size.width * 0.5, controlPointY, size.width, endPointY);
    path.lineTo(size.width, size.height);
    path.lineTo(0, size.height);
    path.close();
    canvas.drawPath(path, white);
  }

  @override
  bool shouldRepaint(CustomPainter oldDelegate) {
    return true;
  }
注意事项
最终我们呈现的效果中需要三个位置和速度不同的波浪动画,所以要设置对应的横坐标偏移量使得波浪之间能分离,因此需要在外面额外留出一个Offset变量控制横坐标,设置一个height控制波浪高度,设置一个speed控制动画速度。
源码
animate_color_background.dart
import 'package:flutter/material.dart';

import 'package:simple_animations/simple_animations.dart';

class AnimatedColorBackground extends StatelessWidget {
  @override
  Widget build(BuildContext context) {
    final tween = MultiTween<DefaultAnimationProperties>()
      ..add(
          DefaultAnimationProperties.color1,
          ColorTween(begin: Color(0xffD38312), end: Colors.lightBlue.shade900),
          Duration(seconds: 3))
      ..add(
          DefaultAnimationProperties.color2,
          ColorTween(begin: Color(0xffA83279), end: Colors.blue.shade600),
          Duration(seconds: 3));

    // final tween = MultiTween([
    //   Track("color1").add(Duration(seconds: 3),
    //       ColorTween(begin: Color(0xffD38312), end: Colors.lightBlue.shade900)),
    //   Track("color2").add(Duration(seconds: 3),
    //       ColorTween(begin: Color(0xffA83279), end: Colors.blue.shade600))
    // ]);

    return MirrorAnimation<MultiTweenValues<DefaultAnimationProperties>>(
      tween: tween,
      duration: tween.duration,
      builder: (context, animation, value) {
        return Container(
          decoration: BoxDecoration(
              gradient: LinearGradient(
                  begin: Alignment.topCenter,
                  end: Alignment.bottomCenter,
                  colors: [
                value.get(DefaultAnimationProperties.color1),
                value.get(DefaultAnimationProperties.color2)
              ])),
        );
      },
    );
  }
}
animate_wave.dart
import 'dart:ui';
import 'dart:math';

import 'package:flutter/material.dart';
import 'package:simple_animations/simple_animations.dart';

class AnimatedWave extends StatelessWidget {
  final double? height;
  final double? speed;
  final double? offset;

  AnimatedWave({this.height, this.speed, this.offset = 0.0});

  @override
  Widget build(BuildContext context) {
    return LayoutBuilder(builder: (context, constraints) {
      return Container(
        height: height,
        width: constraints.biggest.width,
        child: LoopAnimation<double>(
            duration: Duration(milliseconds: (5000 / speed!).round()),
            tween: Tween(begin: 0.0, end: 2 * pi),
            builder: (context, child, value) {
              return CustomPaint(
                foregroundPainter: CurvePainter(value + offset!),
              );
            }),
      );
    });
  }
}

class CurvePainter extends CustomPainter {
  final double value;

  CurvePainter(this.value);

  @override
  void paint(Canvas canvas, Size size) {
    final white = Paint()..color = Colors.white.withAlpha(60);
    final path = Path();

    final y1 = sin(value);
    final y2 = sin(value + pi / 2);
    final y3 = sin(value + pi);

    final startPointY = size.height * (0.5 + 0.4 * y1);
    final controlPointY = size.height * (0.5 + 0.4 * y2);
    final endPointY = size.height * (0.5 + 0.4 * y3);

    path.moveTo(size.width * 0, startPointY);
    path.quadraticBezierTo(
        size.width * 0.5, controlPointY, size.width, endPointY);
    path.lineTo(size.width, size.height);
    path.lineTo(0, size.height);
    path.close();
    canvas.drawPath(path, white);
  }

  @override
  bool shouldRepaint(CustomPainter oldDelegate) {
    return true;
  }
}
fancy_background.dart
import 'dart:math';

import 'package:flutter/material.dart';

import 'animate_color_background.dart';
import 'animate_wave.dart';

class FancyBackgroundApp extends StatelessWidget {
  @override
  Widget build(BuildContext context) {
    return Stack(
      children: <Widget>[
        Positioned.fill(child: AnimatedColorBackground()),
        onBottom(AnimatedWave(
          height: 180,
          speed: 1.0,
        )),
        onBottom(AnimatedWave(
          height: 120,
          speed: 0.9,
          offset: pi,
        )),
        onBottom(AnimatedWave(
          height: 220,
          speed: 1.2,
          offset: pi / 2,
        )),
        // Positioned.fill(child: CenteredText()),
      ],
    );
  }

  onBottom(Widget child) => Positioned.fill(
        child: Align(
          alignment: Alignment.bottomCenter,
          child: child,
        ),
      );
}